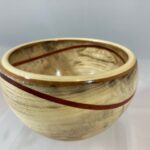
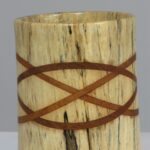
I saw a little bowl by one of the CA turners that had a wave pattern inlay. Couldn’t talk to him in depth, but I got the general idea. Stayed in my mind dormant until COVID-19 hit, and I was homebound.
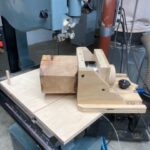
I tried time after time, and the glue joints were sort of jagged and I blamed my bandsaw. Then tried one super-duper bandsaw, and the result was just as bad. A lot of good wood for the fireplace. Then I knew it was me, not the bandsaw. The question was, how to cut a perfectly smooth curve? That’s when the thought of a jig came up. I made several in succession, each went into the scrap pile. I wanted one that fit my 7” band saw that would work for any size wood block from 3” to 5-1/2”. I also wanted to adjust the depth of the arc and the location of the curve. So, I made one at last. And the results are great.
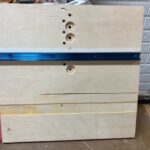
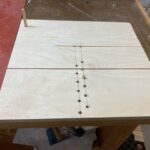
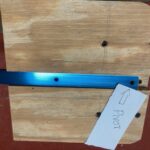
- The base plate. ½” ply min 15×15”. Draw two lines 90° from the center and parallel to the edges (horizontal and vertical). The vertical will become the slot for the blade and the horizontal for ¼” holes for the radius of the arc.
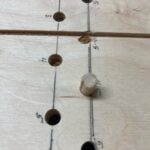
- Mark centers on the horizontal line at 2” from the vertical line, and end at 6” at 1” apart (These dimensions are according to your needs, I found if you drill holes closer, you have a mess). This gives you radius 2”, 3”, 4”, 5” and 6”.
- Draw another horizontal parallel line ½” up, and mark off from 2 ½” to 5 ½” for a second row of holes. You can do as many such combinations to give you radius at any fractions of the inch. I just wanted my radii from 2” to 6: at half inch increments.
- Use your fence and cut on the vertical line to the first horizontal line. Drill ¼” holes at all the 9 centers. These are where you insert the pegs to position your jig for different radius cuts. Mark them or label them for the radius.
- Use the fence at the same location as #4, and arrange, glue and screw a slider under (Wood, T slot bars or solid, Whatever you have) to fit the miter slot on the saw platform. The base should now easily slide up and down the saw table. I like it when the base covers my saw table completely when set up.
- When using any row as your arc reference, line it up with the center of the saw blade and clamp.
Pivot table attachment for my chuck:
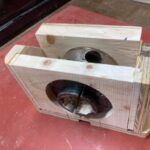
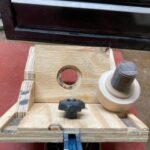
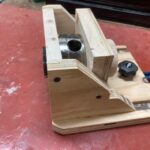
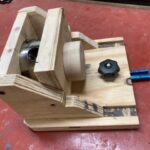
- The second part is a fixture where you can mount a chuck (I prefer the One way chuck, you design for your chuck) so it will pivot on any of the holes of the base.
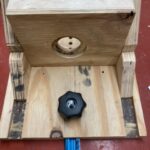
- We need a platform with 2 vertical plates. 6”x6” works for the three pieces. The front one has a hole so your chuck slides in with 1/16” clearance (don’t think it is critical). The rear one is for mounting the chuck. When in place, the jaws of the chuck will protrude out enough to grab the recessed hole (2” x 1/8”) of the work piece, and keep the rear of the work piece flush with the front plate.
- On the rear vertical plate, I made a 1/8” recess hole, just slightly larger than the diameter of the chuck’s rear collar, and a 1 1/8” thru hole, thru which my 1 1/8” wooden screw snugly attaches the chuck. Critical thing is to keep both vertical plates parallel to each other and at right angle to the base when assembled. The front plate is flush with the front edge of the base. The distance between these plates depends on your chuck..
- The center of the above holes on the vertical plates is 2 ¾” from the bottom of the base plate when assembled, to fit my design. (The center of the chuck must be less than half the clearance of your bandsaw) ¾” plywood works well for these plates.
- You may want to reinforce the sides.
- We need a way to adjust where the arc is cut on the work piece. For this, I made a slot on the bottom of the base plate for flush placement of a T-slot bar with a ¼” hole in the front (free to slide). A T slot screw and handwheel on the base secures it anywhere you want. The location of the center of the arc is the ¼” hole. The hole’s location with reference to the front edge of the base, determines the location of the arc on the work piece. This can be marked on the back of the jig along the T-slot bar. The arc radius is controlled by the Base plate in step 1.
- Before you glue them together, make all the holes and slots.
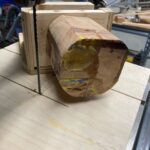
Now, all we need to do is, attach the chuck and work piece, position the base plate, clamp it down, put the ¼” dowel pin in the correct hole for the radius. Mount the chuck and the work piece on the jig, place the ¼” hole of the jig on the dowel, adjust the location where you want to cut the arc. Make sure that you start the work piece well to the left (front of the blade). Check everything is tight, and start the bandsaw and guide the jig clockwise to start a slow cut. If the blade is sharp, you can get a smooth cut ready for glue. 10TPI blade gives a baby bottom smoothness. The arc will be perfect.
Measure and cut some thin stock for inlay to be sandwiched between the two pieces of the work piece. To help the curve, steam the inlay piece and clamp it down in between until it dries completely. It will hold the shape. Glue the three pieces together and make whatever form you want to make. A slight curve will bring out the wave form well.
My formula:
Work piece 4”x4”: and 5”L. Use a 2” Fostner bit and make a recess 1/8” on one end for the chuck.. This is the bottom of your product..
Make a 4”x4-1/2” inlay piece of contrasting color wood 1/16” or 3/32” 1/8” is harder to bend. The longer size is across the grain. You bend it across the grain.
The arc radius is the same as the sides – 4” in this case. It depends on how deep or shallow you want the waves to be.
The location of the arc – 1/3 the side or close to 1.5 to 1.75 from the top of the piece.
Mount on the Jig and cut the work and check the surface of the cut. It will be smooth.
Steam the inlay and immediately assemble the top, inlay and bottom and clamp tight. Let it dry completely. The inlay will keep its shape when dry.
Glue the four surfaces and assemble and clamp tight on all four corners.
When the glue dries, you can shape your piece into anything you see fit.
Note: If the glued pieces slide around, you can drill two ¼” holes on the top of the work piece deep enough to cover the top and bottom pieces for two ¼’’ dowels. Re-tap these holes after clamping the inlay piece after steaming. Then, you can use these holes to insert the dowels to keep the glued pieces in place for easier clamping. Make sure the two holes are well within the portions to be hollowed out.
Good luck. Das Madhavan
February 20, 2021
